To be able to add our iptv subscription in script format to your Vu + (Solo, Solo2, Uno, Duo, Zero, ..), you will need:
1. Your solo VU + & Dreambox
2. Download Putty Software
3. The iptv subscription script for enigma 2 (that we sent you):
Installation Guides
Item #1
Step 1
Remove contents from the package and insert the two AAA batteries into the remote.
Step 2
Plug the power cord into an outlet and into your Firestick.

Step 3
Choose an HDMI port and plug the Firestick into your TV. If you have an HDMI port that is difficult to get to, use the provided HDMI extender.

IMPORTANT: It is NOT recommended to use a USB port on your television as the power source for the Firestick. You should use the provided power adapter and plug it into an actual power outlet to avoid problems with the device.
Step 4
Select the HDMI Input with the television remote that you plugged your Firestick into.
Step 5
Press the Play button 

Step 7
Choose your language. In this example, English (United States) is selected.


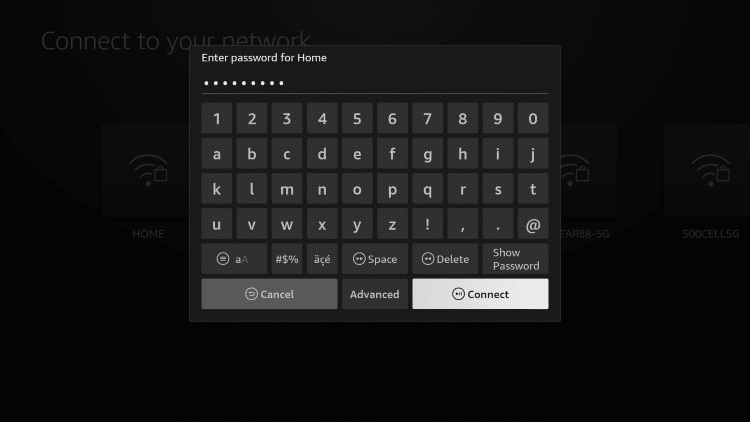
Step 9
Enter your network password and click Connect.
Step 10
Your device will check for updates.

Step 11
It will then begin downloading the latest software.

Step 12
After the latest software has been installed, you will be prompted to sign in to Amazon.
If the device recognizes you, click Continue.
Or, you can use a different Amazon account by clicking Change Account.

Step 13
If you already have a Firestick device you will be prompted to Restore Fire TV to the same settings. Click Skip or Restore.

Step 14
You are then prompted to select your brand of TV.

Step 15
Click Next.

Step 16
Toggle up and down volume buttons on your remote and click Yes after heaering the music from your TV.

Step 17
Your remote is now successfully set up. Click OK.

Step 18
If you are not a Prime member, you can Try Prime FREE for 30 days. Or click Not now.

Step 19
You are then given the option to purchase Amazon Kids+. Click Start or No Thanks to skip.

Step 20
We are now prompted to select our preferred streaming apps. Choose Get Started or No Thanks to skip.

Step 21
You can select any streaming services that you prefer. (If you are going to jailbreak your device, there is no need to install any available apps.)

Step 22
After making your apps selection click Finish.

Step 23
You can now select your Parental Controls. Click Enable or no Parental Controls.

Step 24
You will now encounter the Firestick home screen.

Step 25

Step 26
You are then presented with the Firestick home screen.

Firestick Setup is now complete. Enjoy!
Item #2
Step 1 – Prepare for Installation
1. From the home screen of your device, locate the search bar and open it.

2. Search for the Downloader application.

3. Select it.

4. Choose “Download” or “Get”.

5. Wait a few seconds while the app downloads.

6. You are notified when the installation has been completed.

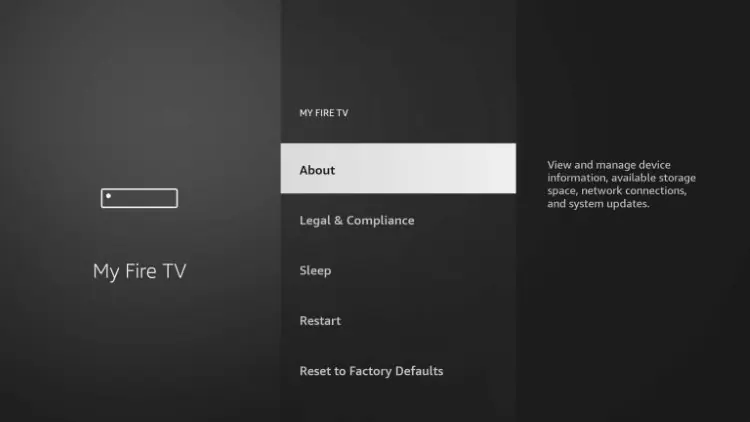
7. Go back to your Settings and click My Fire TV.

8. Choose About.
9. Hover over Fire TV Stick (or other name) and click the select button 7 times until you see “You are now a developer” message.
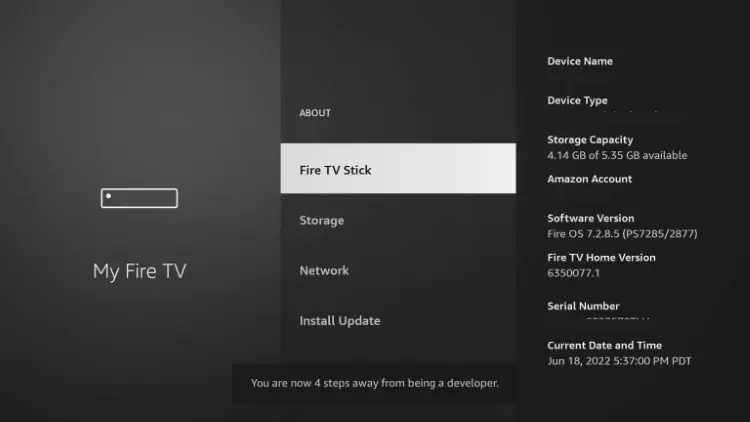
10. Return to the My Fire TV tab and Developer options is now listed.
NOTE: If you have an older model of Fire TV Stick, you will see Developer Options within My Fire TV without selecting “About”.

9. Choose Install unknown apps.

10. Select Downloader.

11. Unknown Sources has now been enabled for the Downloader app which we will use to install TiviMate.

We can now continue to the downloading steps.
Step 2 – Install TiviMate IPTV Player
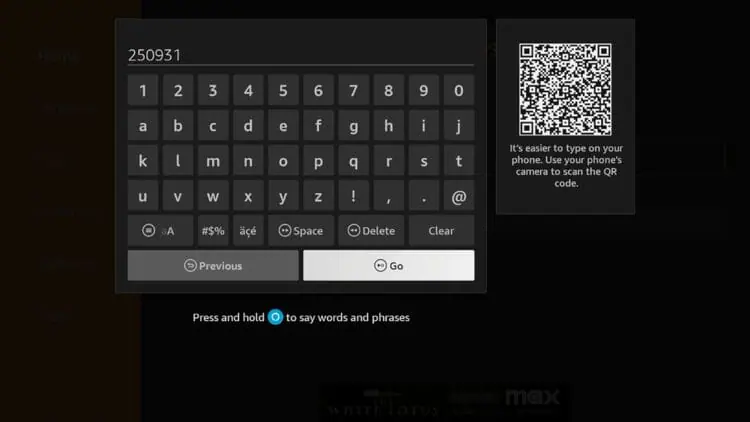
1. Open Downloader and click to select the URL menu bar as highlighted below.

3. Input 250931 and click Go.
NOTE: For immediate install, you can insert 272483, which is the official Downloader Code for TiviMate IPTV Player.

4. Wait for the redirect page to load.

5. TROYPOINT Toolbox home screen is now presented.

6. Scroll down to find TiviMate and click Download.

7. Wait for the app to download.

8. Click Install.

9. The TiviMate “Ready to launch!” message now appears.

10. Click Done.

11. You will now return to the Downloader app where we can remove the installation file. Click Delete.

12. Click Delete again.

Installation is now complete. Continue reading to learn how to set up the app on your preferred device.
How to Set Up TiviMate Premium
After the app installation is complete, we can open the app and authorize an IPTV Service for use.
NOTE: Initializing an IPTV Service within TiviMate requires an M3U URL or Xtream Code. This can usually be found in your service welcome e-mail or by contacting customer support.
While there is a free version available for use without a subscription package, those who choose to use the free app will miss out on tons of fabulous features.
For example, if you try adding a channel or channels to favorites, you will be prompted with the following message:

For those who wish to use the free version, simply click Cancel and continue using the app at no charge.
However, if you purchase the premium option through the Companion app, we can log in for added benefits.
If you need to create an account, you can follow the instructions below on how to do so through the Google Play Store.
Step 1 – Install TiviMate Companion App
As noted, the premium version is currently only available in the form of a lifetime subscription.
This covers up to 5 devices which you can manage within the Companion App.
Prior to initializing Premium, users must register for an Account via the Companion App. This app is only available in the Google Play Store, therefore must be installed on Android Device or through BlueStacks or another Android emulator.
NOTE: Users can also sign up for Premium on the official TiviMate website prior to installing the companion app.
If you do not have an Android phone or device, you must install the BlueStacks emulator on your PC to access the Google Play Store.
IMPORTANT: If you’re using a generic Android TV Box with stock Android, you can install the Companion app through the Google Play Store. Devices running the true Android TV operating system such as NVIDIA SHIELD don’t include this app so you will need to set up an account on an Android phone, tablet, or through BlueStacks as shown below.
Once installed, use the instructions below to set up a premium account.
1. Open the Google Play Store on your Android Device. We are using Bluestacks in this tutorial on my Windows PC. Search for “tivimate companion” and select the first choice.

2. Click Install.

3. Wait for the app to install.

4. Click Open.

5. Click Account.

6. Enter your preferred username and password and select Sign up.

7. Re-enter your password and click Create account.

8. Choose the subscription package of your choice and enter your payment information.

9. Registration is complete!

Be sure to write down or remember your login information to sign into the app.
Step 2 -Log In to TiviMate Premium
After you have created your Premium account, you can log in to the service within the app previously installed.
1. From the home screen, select Settings.

2. Choose Unlock Premium.

3. Click Next.

4. Choose Account.

5. Enter your login credentials.

6. Click Next.

7. Enter the device name of your choice and click Activate.

8. Click OK.

That’s it! Once logged in, you will have access to all advanced features of the app for an enjoyable live-streaming experience.
Item #3
NOTE: We are using a Fire TV Stick 4K Max in the screenshots below. However, this exact method will also work on Google/Android TV Boxes as well as any variation of Firestick or Fire TV as well as popular Smart TVs.
1. You must first install the Downloader app on your device. If you haven’t done this, refer to our tutorial below.

2. Launch Downloader and place your cursor in the URL box and click the OK button on your remote to open the keyboard.

3. Now, type 250931 and click Go. This is the official code for the TROYPOINT Toolbox.
4. You are now presented with the home screen of the TROYPOINT Toolbox.

5. Scroll down to find IPTV Smarters Pro and click Download.
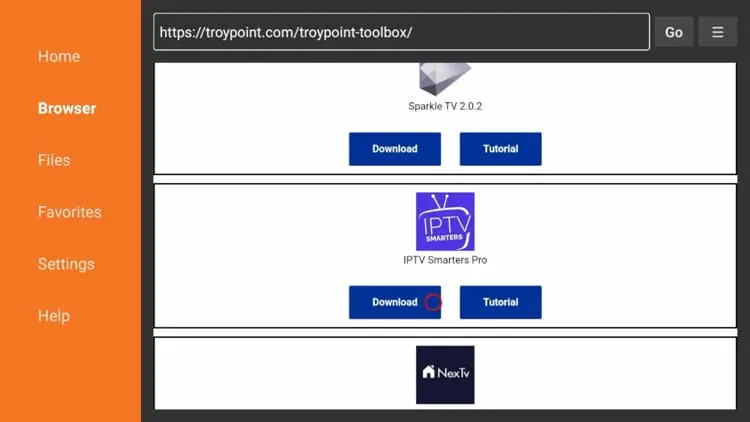
6. Wait for the app to download and click Install.
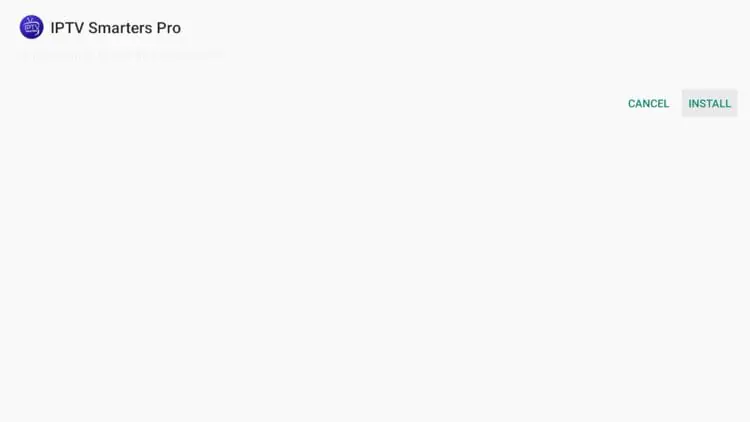
7. Then click Done.

8. You are then prompted to delete the installation file. This will free up space on your device. Click Delete.

9. Choose Delete again.

10. Installation is now complete. You can find IPTV Smarters Pro in your applications list.

Continue reading for more info on this application and other install guides for various devices.
How to Setup IPTV Smarters Pro
After installing, you may launch the application for use. First, you are prompted to select your layout.
- If using a streaming device such as a Firestick or Android TV/Google TV box, select TV and click SAVE.

- Make sure to read the new announcement from Smarters Pro noting that they do not provide any playlists or content and click Accept.

- Choose Login with Xtream Codes API
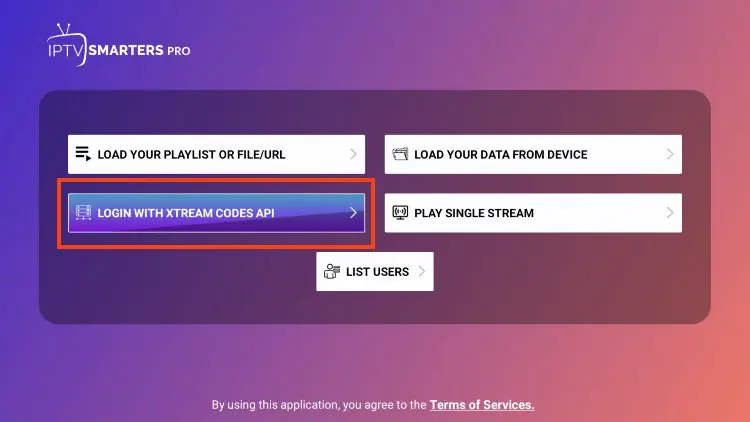
- Or if your IPTV Provider does not provide Xtream Codes setup, you can use an M3U URL and choose to Load Your Playlist or File URL.
- Most M3U URLs require that you input your service username and password. You will usually see where these go inside the URL as they are indicated by “username=xxxx” & password=xxxx”. You will input your username and password where the x’s are located.

- Because these M3U URLs are so long to type, we recommend using Xtream Code if possible which is what we show in the screenshots below.
- Enter account information and click Add User.
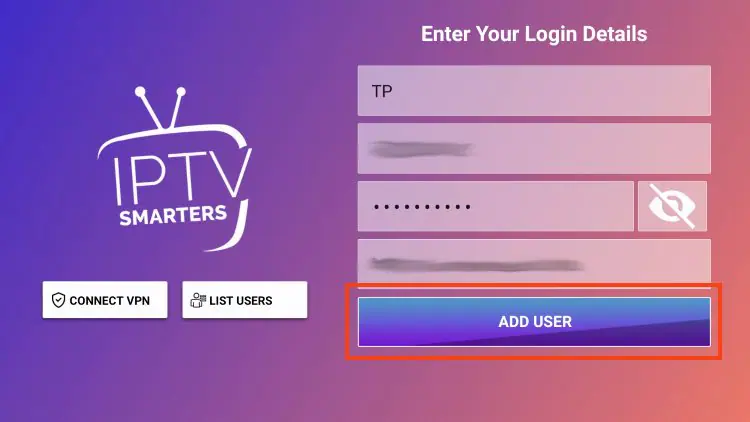
- Wait for User added successfully message to appear.

You can now access your content for live streaming and more.
How to Install IPTV Smarters on Apple TV
While most will use IPTV Smarters Pro on their Firestick or Android TV/Google TV streaming device, there is also an app for Apple TV devices. We are using an Apple TV 4K in this instance.
1. Click App Store from the home screen.

2. Search for ‘smarters’ or ‘iptv smarters’ and choose Smarters Player Lite. It’s important you check the ratings to ensure you are installing the correct app.

3. Click the download icon.

4. Wait a few seconds for the app to install then click Open.

5. Launch the app and click Don’t Allow if this message appears.

6. Choose your login method. We used M3U URL in this example.

7. Enter your IPTV login credentials and click Add Playlist when done.

8. Wait a few seconds for your playlist data to load.

9. You have successfully installed and setup IPTV Smarters on your Apple TV device.

10. Select any channel from the list and you will experience full screen playback.

How to Install IPTV Smarters on iPhone/iPad
In addition to Apple TV there is also an iOS app to access IPTV Smarters on your iPhone or iPad.
1. Within the Apple App Store, search for IPTV Smarters and find Smarters Player Lite. Click Get.

2. Click to Install.

3. Launch the app and you will encounter the login screen.

Input your login credentials and you can access your content. Enjoy!
How to Install IPTV Smarters Pro on PC
Those who prefer to use the application on a Windows PC can easily install it using the guide below.
1. Visit the IPTV Smarters Pro Official Website and select Downloads at the top of the page.

2. Click Download for Windows.

3. Wait for the application to download.

4. You will then see download notification at the top of the page. If you see the “download blocked” message, select it.

5. Choose download unverified file.

6. Select the IPTV Smarters download file.

7. Wait for the application to install.

8. IPTV Smarters on PC will now launch. You can login with your provider credentials.

9. Installation on your computer is now complete.

Installing IPTV Smarters on Android Phones & Tablets
Currently, the only way to use IPTV Smarters on an Android phone or tablet is by directly installing the APK.
While there is an application available on the Google Play Store, we advise against installing this as it does not function properly and is missing many features that most IPTV Subscribers need for a full media experience.

There are numerous 1 Star reviews and complains from customers with a few pictured below.
Make sure to only use the official APK which you can find in the TROYPOINT Toolbox for Android phones and tablets.
IPTV Smarters Pro App Review
IPTV Smarters Pro remains one of the most widely used IPTV players available across multiple platforms. Here’s what our testing revealed about this application.
What We Like
- Completely free to download and use (no subscription required for the player)
- Passed VirusTotal scan with zero threats detected
- Works on Firestick, Android TV, Apple TV, iPhone, iPad, Windows, and Android phones
- Accepts M3U URLs, Xtream Codes API, and local playlist files
- Built-in Electronic Program Guide (EPG) populates automatically with Xtream Codes
- Multi-screen support watches up to 4 channels at once
- Recording capabilities save live TV for later viewing
- Multiple playlist support manages several IPTV services in one app
- External video player integration (MX Player, VLC)
- Parental controls protect certain content categories
- Web player option streams through any browser without installation
- Regular updates from active development team
What We Don’t Like
- Removed from Google Play Store and Amazon Appstore (requires side-loading)
- Removal raises safety and legality concerns for some users
- Requires separate IPTV subscription for actual content
- Fake versions exist in app stores with missing features and negative reviews
- Some users report buffering during peak viewing times
- Customer support complaints appear in forum discussions
- EPG may not load properly without provider-side configuration
- Playlist setup can confuse beginners unfamiliar with M3U or Xtream Codes
IPTV Smarters Features & Details
IPTV Smarters has dozens of available benefits and extras which is why it is such a popular option.
This includes Favorites, recording, EPG, external video players, web player, multi-screen, parental controls, speed test, master search, multiple playlists, and much more.
Multiple Playlists
One of the best features this app provides is the opportunity to download and use more than one “Playlist” or service. TROYPOINT recommends having a backup service in case your favorite provider is not working.
This is a great way to ensure your live streaming is always available and manage your favorite channels across multiple platforms. Within the settings of IPTV Smarters, you can choose Add User to integrate numerous playlists within one location.

Electronic Program Guide (EPG)
If you setup the app with Xtream Codes then your EPG should automatically populate. If using an M3U URL you will need to install the EPG manually as outlined below.
Select Install EPG from the app’s main menu:

Click the box for the EPG source link and enter your EPG M3U URL.

When finished, click Add EPG.

You can now access the Electronic Program Guide (EPG):

Using the EPG is the best way to view all Channels and Programs available in an easy to use format.
Recording
Users can also record with the app and watch content at a later time.
1. Launch the application and from the home screen, select Recordings.

2. Choose Change Directory to set the path for recordings.

3. Choose Internal Storage.

4. Choose New Folder. (Or if you have a file you wish to send recordings to, select it from the directory).

5. Click the select button to type the new folder name.

6. Type Recordings and choose Next.

7. Click OK.

8. Choose your Recordings Folder.

9. Click OK.

10. Return to your Channels List and choose the channel you wish to record. Long-click the select button on your remote and select Start Recording.

11. Choose Duration (in Minutes).

12. Choose your recording time and select Next.

13. Select Start Recording.

14. You will then encounter Recording Started message.

15. Return to the home screen and choose Recordings.

16. Find your Recording and click it. You can either select Play or Delete.

IMPORTANT Note: Recording will likely require a USB Drive for storage purposes. You should make sure that it’s properly formatted as FAT32.
Multi-Screen
There are additional features located within this app that we can take full advantage of.

This includes the ability to watch multiple channels at once with the multi-screen feature.
There are numerous layouts available including dual-screen and 4 screen streaming.

Users can select their preferred channels to watch multiple streams simultaneously.

Parental Control
Those who want to set parental controls can easily do so within the settings menu.

This is enabled by creating a parental password that will be prompted when accessing various content.

External Video Players
IPTV Smarters also offers the ability to use an external video player for streaming. We have found MX Player works great within this app for the movies and TV series options. We suggest using the built-in player for all of the other options.
Prior to integrating this, we must install MX Player on our preferred device. Once installed, we can authorize use within settings:
- Click Player Selection

- Add Player

- Choose MX Player.

- Select Add.

- Choose the Video Player category you wish to change.

- Select MX Player and go Back.

You have now integrated an external video player within IPTV Smarters Pro.
However, we also recommend editing the Player Settings.

- Make sure Hardware Decoder is selected and click Save Changes.

One final step we suggest is turning off the AutoStart on Bootup which will disable the app from launching upon turning on your device.
You can find this within the General Settings Tab of Smarters Pro Settings.

IPTV Smarters Pro is now set up and ready for use on any device. Enjoy!
Web Player
A fabulous feature that is sure to make tons of users happy is the all-new web player from Smarters Pro which makes it easy to access your live channel platform on any device that has browser capabilities.
As you can see above, there is a way to download the application on PC and various other devices, but as you can see in our guide below, there is not an official application within the Google Play Store.
This means that those with Android devices don’t have the easiest method to use IPTV Smarters. Luckily, the web player is extremely simple and has integration options for 1 Stream Panel, Xtream Codes, or via M3U URL.

After integrating your service, you can scroll through all of your channel options just like you would on any device! This is a great way to watch television on the go or when you are traveling. Give it a try!

Item #4
How To Install VLC Media Player
1. From the home screen of your device, hover over the Search icon and select Search.

2. Search for VLC Player

3. Choose the VLC for Fire App.

4. Click Get or Download.

5. Wait for the app to download.

6. You will then encounter VLC for Fire Ready to launch! message. Click to Open the app.

7. When prompted, click Allow.

8. You will then encounter VLC is all set! message.

Installation is now complete. You can integrate VLC within your preferred apps for buffer-free streaming. Enjoy!
How To Integrate VLC Player
After installation of the app is complete, we can now integrate VLC Player into our favorite applications.
In this guide, we are using Cinema APK with VLC. However, this will also work for most apps including those in the TROYPOINT Best APK’s list.
Use the guide below to integrate VLC Player within Cinema:
1. Click Menu button in the upper left-hand corner (3 horizontal lines).
2. Scroll down and select Settings.
3. Click Choose default player

4. Choose VLC Player

Item #2
STEP 1:
Locate and open the App Store on your iPhone/iPad/Apple TV.
 1")
STEP 2:
Next, search for the GSE SMART IPTV app.
 2")
STEP 3:
Select the GSE SMART IPTV app developed by droidvision. The tagline for the app is ‘Advanced IPTV solutions’. Note the app size is 104.5 MB.
 3")
STEP 4:
Once you’ve installed the GSE app, go ahead and open it and allow for Bluetooth connectivity. This way you can cast your screen from iPhone or iPad directly to your TV via Google Chromecast.
 4")
STEP 5:
Under the remote playlist section, you will see Plus sign on the upper right-hand side. Press this button. Alternatively, you can go into the menu to add your M3U playlist.
 5")
STEP 6:
Here it will ask if you’d like to Add an M3U URL, Add Json URL, or add from the web interface. Go ahead and select add M3U URL option.
 6")
STEP 7:
For playlist name, we can write anything as this is just for reference for loading this particular URL from the playlist manager. The playlist link is the actual URL we’ll need to copy and paste into here.
 7")
STEP 8:
Once entered it should download the playlist. If it does not, go back to the playlist manager menu (SEE STEP 5). Here you should see the M3U URL file we just uploaded. Tap it to load the playlist created.
 8")
STEP 9:
You’ll know it’s successfully loaded if you see the different channel groups. You have successfully configured the GSE SMART IPTV app and ready to start streaming!
Item #2
How To Setup IPTV On MACs Laptops
Setup IPTV on your Mac OS can change the way you stream by giving you access to a huge number of shows and content that you can watch whenever you want.
With the IPTV Smarters Pro app, this guide will show you how to set up IPTV on your Mac.
Allow us to begin!
- Download IPTV Smarters Pro for Mac Os

To begin, you will need to download the IPTV Smarters Pro Mac version. You can download it directly from the official website here.
Download IPTV Smarters Pro (MAC)
With the help of this tool, which was created especially for IPTV users, you can easily stream live channels, films, and TV series on your Mac.
- Enable Installation from Unidentified Developers
Mac OS has a built-in security feature that by default stops you from installing apps from makers you don’t know. You will need to turn on this option in order to install IPTV Smarters Pro:
- Click on the Apple menu at the top-left corner of your screen and select “System Preferences.”
- In the System Preferences window, click on “Security & Privacy.”
- Click on the lock icon at the bottom-left corner of the window and enter your admin password to make changes.
- Under the “General” tab, look for the option that says “Allow apps downloaded from” and select “Anywhere.”
- If this option is not visible, open the Terminal app and enter the following command:
- Re-lock Security Settings: Once you have enabled app installations from anywhere, click the lock icon again to prevent further changes.
- Install IPTV Smarters Pro

- Go to your “Downloads” folder and find the IPTV Smarters Pro file you downloaded.
- Double-click the file to open the installer. Follow the on-screen instructions to complete the installation.
- Once the installation is complete, you can find IPTV Smarters Pro in your “Applications” folder. Double-click to open it.
- Enter Your IPTV Subscription Details
- Enter Your Login Credentials: You will need the login details provided to you by your IPTV service provider. This information is usually sent via email or WhatsApp. It includes:
- Username: Provided by your IPTV service.
- Password: Provided by your IPTV service.
- Server URL: Also provided by your IPTV service.
- Complete the Setup: Once you have entered your details, click “Add User” to complete the setup.
- Explore IPTV Content!
- Enter Your Login Credentials: You will need the login details provided to you by your IPTV service provider. This information is usually sent via email or WhatsApp. It includes:
Conclusion
If you find any trouble setting up IPTV on your Mac or face difficulties during the installation or login process, don’t worry—help is just a message away. We know that technology problems can happen, and we’re here to make sure that your IPTV service goes smoothly and that you enjoy it.
How to Get in Touch:
Support through email: Our email address is Info@britixmedia.uk. Our team is ready to help you with any problems or questions you may have. Whether it’s troubleshooting, technical advice, or general inquiries, we’re here to help.
Item #2
Installing IPTV on Mag Devices:
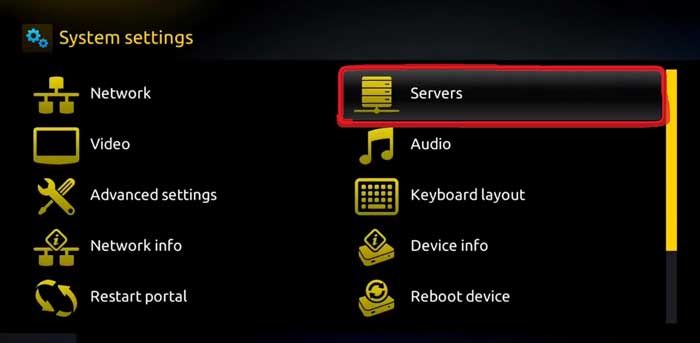
1.On main menu Click on Settings.
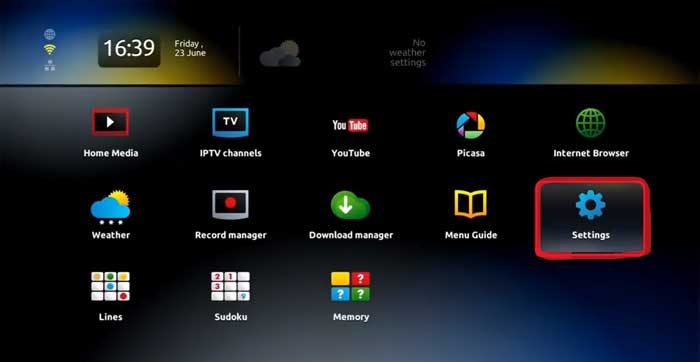
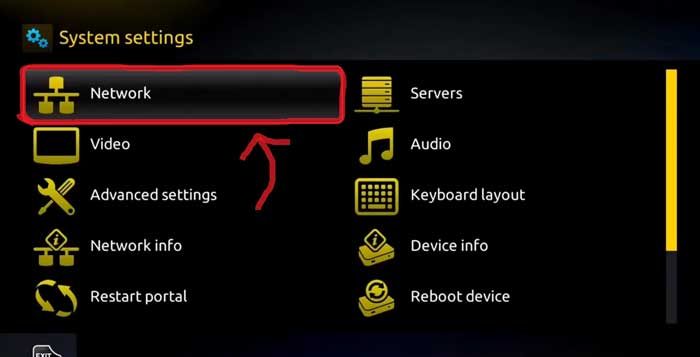
2.From Settings Click on System Settings.

3.Once you are on system settings, next step would be Network, Click on Network and Connect your box to Internet either via Wifi which is wireless or Directly to Ethernet via cable.
4.Once you are connected to Internet, It’s now time to find your Mac Address. You MAC Address starts with 00:1A:79, this number you can find in the back of the box or inside the box in settings, take a note of it and pass it to our team via our chat, or via email. Our support will then take your Mac Address and whitelist it, and send you a portal. Please save that portal link, we’re gonna need it shortly after.
5.Go back to System Settings to activate your IPTV Service for MAG BOX.

6.On main menu Click on Settings.
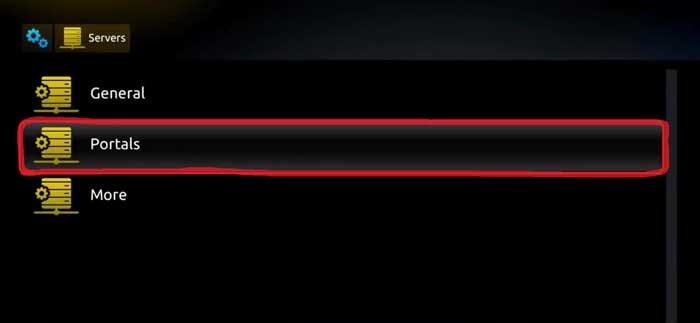
7.Click on Portals.
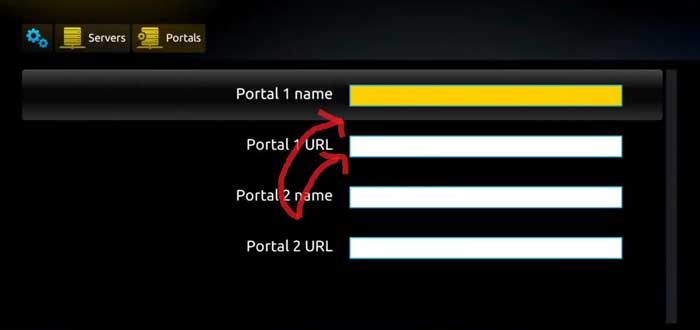
8.We are almost done, now you need Portal Name and Portal URL. You can enter anything for Portal Name, for the Portal URL, use the one provide for you from the chat or support of our website or email.
9.Click on restart portal.
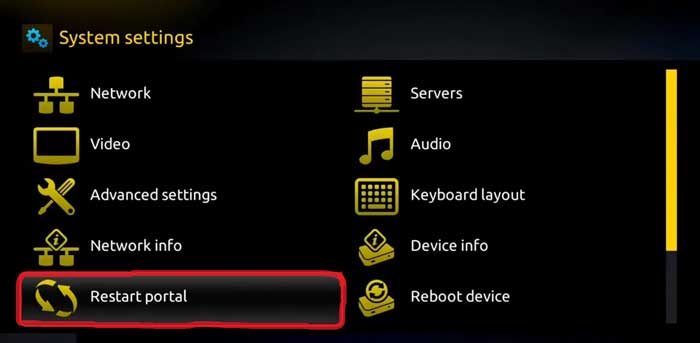
10. If you did everything right, you should see a yellow bar running in the middle of the screen after your Portal restart. You can now watch all live tv channels using your brand new MAG BOX..
10.Enjoy!
Item #2
2
AMake sure your Vu + & Dreambox receiver is connected to your home network. how? You have to go to menu.


3
You have now your network IP address.
4
Open the software putty and copy the IP address of your receiver as in the picture below and press open:

5
A window opens with the following dialog box:

6
Type root: then Enter on your keyboard.
7
Following root: paste the enigma2 script that your iptv provider gave you
wget -O /etc/enigma2/iptv.sh “http: // URL-THE-SERVER : PORT /get.php?username= xxxxxxx & password = xxxxxxx & type = enigma22_script & output = ts’ && chmod 777 / etc / enigma2 / IPTV. sh && /etc/enigma2/iptv.sh
Then Enter: The scipt will load your IPTV list on your VU + & Dreambox

8
And now. Reboot your receiver and go to the favorites (blue button) your iptv list is there.
Problems and solutions:
Many vu + & Dreambox users have experienced Root and password issues.
The Login is default: root
The default password: empty
If it does not work try Login: root password: (vuplus, dreambox, ect) or make a backup of your image and reset your demo factory.
You will find on the site of info@britixmedia.uk Black Hole images for your receiver
Item #2
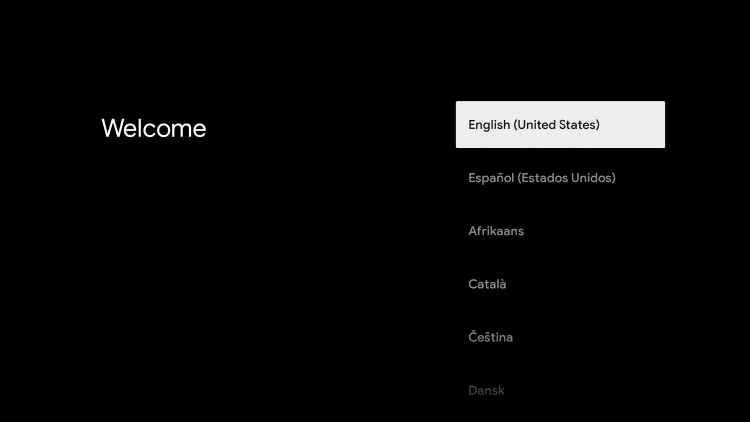
1. Choose your preferred language
2. If you are an Android user or have the Google Home app, you can easily set up your device by scanning the QR code and following the instructions within the app.

3. If you do not have the Google Home App, choose Set up on TV instead

4. Select your Wireless Network

5. Enter your password if required

6. Wait for the network to connect

7. Allow system update to download

8. System update will then install

9. Your device will then Restart

10. Click Accept
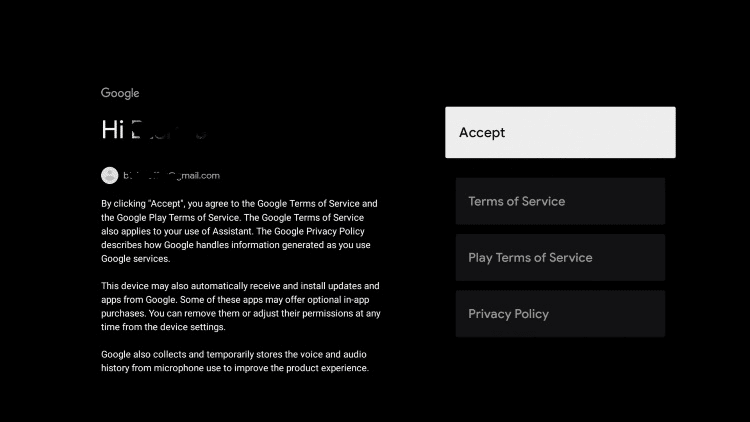
11. Choose I agree

12. Click Accept again to agree to terms of service

13. You can choose to sign up for Google emails or click No thanks

14. Click Continue

15. Select Allow

16. Choose your preferred apps

17. Click Confirm

18. We will now prepare the remote for use. Click Set up remote
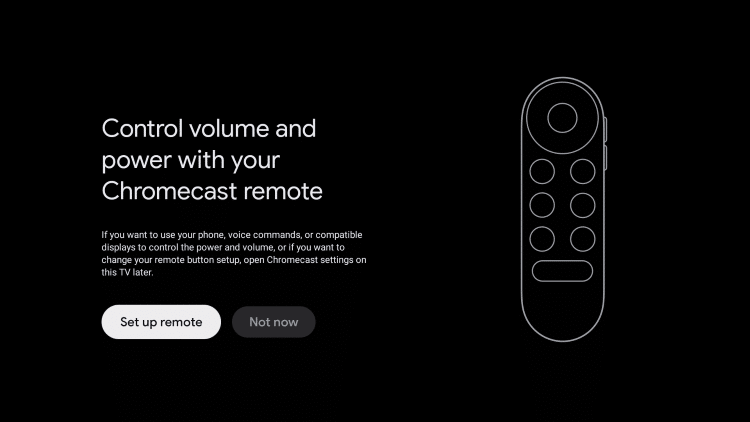
19. Select the device you’ll use for Sound

20. Choose your TV brand

21. Click Next

22. Press the Power button to turn the TV off and turn it back on again

23. If the remote works, click Yes

24. Click Next

25. Wait for your apps to install

26. Click Start exploring

27. You will now see the Chromecast with Google TV home screen

Chromecast setup is now complete. Enjoy!
Note: If you ever Reset your Chromecast with Google TV, I recommend bookmarking this page to repeat this setup process.
